Let the car cool and remove
the bonnet.
Remove the + battery connector
Remove the hoses to and from
the turbo's compressor side
Drain the water from the
engine
Dismantle all water and oil
lines to and from the turbo.
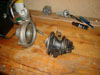
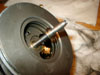
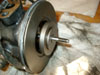
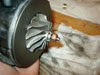
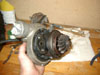
Separate the turbo body from
the exhaust house by loosening the clamp holding the turbo body and exhaust
house together
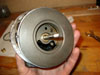
Separate the compressor
housing from the turbo body.
Compressor housing and
turbo body separated
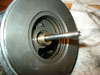
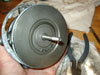
Mark the compressor wheels
position on the turbine axis. IMPORTANT! must be done or the balance is off.
The turbo won't work perfectly and the the new bearings will worn out rather
quick.
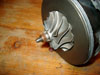
Compressor
wheel and axis marked for position.
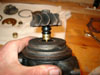
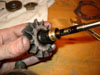
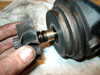
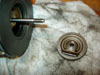
Remove the compressor wheel
nut and remove the compressor, IMPORTANT! use a socket on the turbine axis
nut to lock the axis.
Compressor
wheel removed
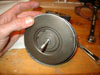
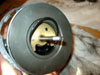
Remove the "snap
ring" and remove the insert with the oil deflector.
Insert and oil deflector
removed
Remove the O-ring, thrust
ring, and the thrust bearing.
Compressor side bearing
showing
Tip the turbo and the bearing
"slides" out.
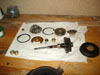
Compressor side parts laid
out
from the left to right:
Top row:
nut, compressor, snap ring, insert, oil deflector
Middle row:
O-ring, thrust ring, thrust bearing, bearing
Bottom row:
new bearings
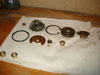
Parts on paper
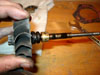
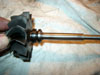
Press out the turbine axis.
Turbine axis showing
the bearing
Now you got the turbo in
pieces.
Turbine axis with bearing and the turbine
piston ring on the axis
Lift of the heat shield.

Heat shield
off
All the parts laid out.
Parts on paper 2
Time to clean everything, use
a cloth and fresh motor oil. Use a hard plastic knife or soft metal knife to
carefully scrape off all carbonised oil. But you must not make any scratches
at all on any part.
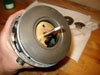
Check the turbine axis for
wear and tear. If the axis shows major damage then you need to send the
turbo to a specialist. But if it shows marks like this axis, then just the
bearings were needed to be changed.
If the turbo pushes oil into the exhaust house during high boost then the
piston ring on the axis is needed to be exchanged.
Cleaned axis with piston
ring mounted
Inspect the bearings and
exchange them.
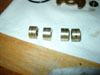
New bearings in the
middle
Compressor bearing on the left
Turbine bearing on the right
From now on every internal
part shall be oiled before mounting.
Mount bearing on the turbine
axis. Mount the axis in the turbo body.
Inserting the turbine
axis
Mount the compressor bearing.
Well oiled bearing
about to be "slotted" in
Mount the thrust bearing.
Thrust bearing
sliding down the axis
Mount the thrust ring and the
o-ring.
O-ring about to be
mounted
Put the oil deflector together
with the insert.
If the turbo pushes oil into the compressor side during high boost, exchange
the piston ring on the central part of the oil deflector.
Oil deflector
inserted in the insert
Slide the insert on the axis.
Press the insert into the turbo body.
"Slide
on"
Lock the insert in the turbo
body with the snap ring.
"locked!"
Mount the compressor wheel and
the nut. Align the "marks".
Note the "marks"
Tighten the nut on the axis to
lock the compressor wheel.
The compressor wheel will follow the nut around when tension is added, so be
careful of the "marks". You shall not force the compressor wheel
to stay in one place due to the risk of deformation and rupturing. Just turn
the compressor wheel a little bit before tensioning the nut.

Compressor wheel locked
on target
Mount the compressor housing
Turbo put together
Put everything back in reverse
order (hoses, IC, etc.). But remember to fill the turbo with fresh oil
before tightening the oil line to the turbo.
Fill up the coolant
put back the battery
connector, mount the bonnet.
Done!